Introduction to GIT
Why do we need GIT?

Before the version control system, developers in the team used the file system. In this system everyone needed to have multiple copies of the same file/folder to keep track of the changes they themselves and others were making. It was very difficult among the develgopers to update the files every time each developer made some changes. To overcome this issue, the Version control system was adapted.

GIT is a version control system (VCS). Before going into its depth, let’s understand an important concept, Version control.
What is Version Control and what is its purpose?

Version control system:

Version Control is a system that stores all the changes of a file or set of files as versions over time. Whenever we require a specific version, we can roll back to that particular version and access its files/folders. This helps in managing and tracking the file system.

  • Version Controlling system is also called as Revision Control System or Source Control System.
  • Operations that can be done in VCS are Addition, deletion and modifications to files and directories.
There are 2 types of version control Systems:
  • 1. Centralised VCS
  • 2. Distributed VCS

Centralised VCS:

A centralized source has both a server and a client. The server acts like a master repository which contains every version of the code and all of its branches. The client side is like a local unit which communicates with the server and pulls all the code or the latest version of the required code from it. For any kind of project, generally the user or the client will have to get the code from the master repository or the server.

Once this communication is established between the client and the server, the latest version of the code will be available on the local machine and any changes can be made. Remember that these changes that you make are only made in your local machine which contains only a copy of the original code. In order to reflect the changes onto the master repository, one must 'commit' those changes. Committing a change is nothing but merging your own updated code into the server.

This model is said to be centralised because the main control remains at one central unit which is the server. Every time changes are committed by anyone to the source code it becomes a new version.

Hence, the basic flow of working involved in the centralized source control is getting the latest version of the code from the central repository to the local machine, making the required changes and committing them to the server.

Eg: SVN,CVS
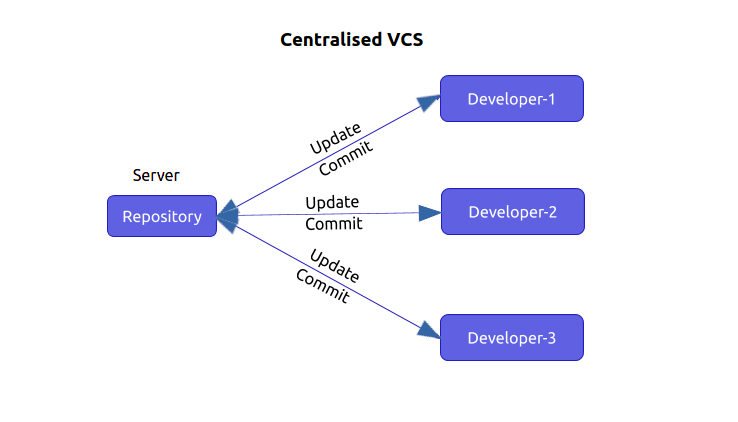
Centralised VCS
Distributed VCS:

Unlike the Centralised VCS, in the distributed VCS, every developer or the user has their own local server which will contain a copy of the entire code, its history, its branches and its versions in it. In this way, every client or user can work locally though being disconnected, which is an advantage over the centralized source control.

When working on a project, you pull the code from the local server to your machine, then make your changes and commit them to your local server. At this point, your local repository will have ‘change sets‘ but the changes are not reflected in the master repository because the master repository has different 'change sets'. To commit the changes from the local server into the master repository, you have to issue a request to it. Then, the code will get updated in the master repository also. Getting a new change from a repository is called “pulling” and merging your local repository ‘set of changes’ is called “pushing“.

To summarize, in the distributed VCS model, changes are first committed to the local server or repository and then the ‘set of changes’ will be merged to the master repository.

Eg: Git, Mercurial, Bazaar…etc
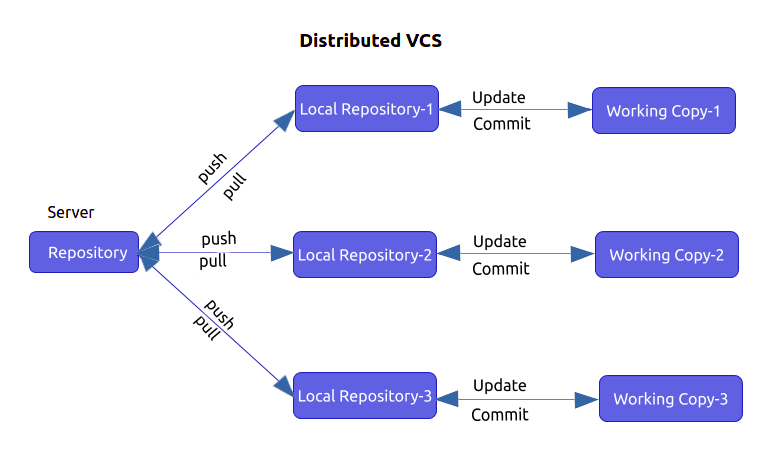
Distributed VCS

Note: Distributed Version Control System also has the Central version/ Master branch but its functionality is different when compared with Centralised VCS.

GIT is a Distributed version control system. GIT is Open source software which helps in managing and tracking of the source code over a development phase of Software Development Life Cycle (SDLC). It can store the history of the content which might be a file or a set of files. Git provides collaborative changes among the developers.

Basic Terminology
  • Repository:
    Repository is a storage location which contains all the project's files. Repositories might be either Public or Private.
  • Fork:
    In Operating systems terminology, fork means a child process. Forking a project enables a user to have a personal copy of a remote repository/another user’s repository. It allows users to experiment with changes in the project, without altering the original project.
  • Clone:
    Downloading an existing project from the repository. Repository might be Private or Public. Taking a local copy of the project to a local machine technically called Cloning.
  • Add:
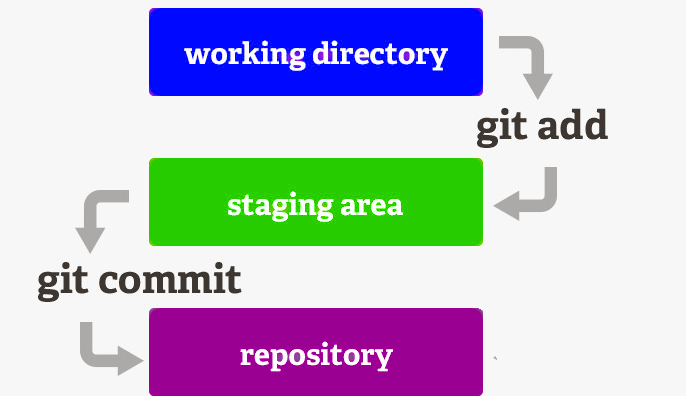
    To add newly created or modified files to the index for the Git to track, add is used.
  • Commit:
    Commit helps in recording changes to the repository, which will store it as a history in the repository since the previous commit.
  • Push:
    Push refers to the process of sending all your local committed changes to a remote repository hosted in Bitbucket or GitHub.
  • Fetch:
    Fetch aids in downloading the latest commits, files and references from the remote repository. It enables a user to know what the other users have been working on, after the user has cloned the repository into their local machine
  • Pull:
    Pull refers to the process of fetching changes and merging them from remote to local, so that the local repository is up to date.
  • Artifact:
    In a workflow, sharing the data between the jobs is very much essential. Artifacts are responsible for sharing the data between the jobs. Once the workflow is done it will store the data as an artifact. In GIT there are different stages there.


Different Stages in artifact
  • Untracked:
    User changes the artifact/files in this stage.
  • Staged:
    Artifacts are added to the index, and files are Staged.
  • Committed:
    Artifacts are stored in Git database.

Stages of Git Project
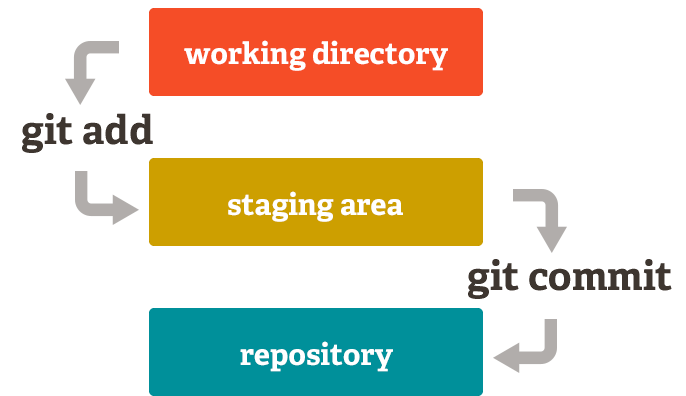
  • Working Directory:
    It is the root directory of the Git Project in the local system.
  • Staging Area:
    It also called Index. All the changes are built here before being recorded to the Database.
  • Git Repository:
    The place where all committed files are recorded in the local system.
  • Remote Repository:
    Remote repository is where all the project files are stored in web by pushing them from the local Git Repository.

Stages of GIT Project


Notable Commands on GIT
  1. Git init
    Initialise with empty repository
    Syntax: git init <repository name>
  2. Git status
    check the status of the files in the git repository
    Syntax: git status
  3. Git add
    can be used to add a specific file to staging area.
    Syntax: git add <file_name>
    can be used to add all the files in the working directory to the staging area.
    Syntax: git add .
  4. Git ignore
    If you want to ignore some unwanted files. create a text file with name
    .gitignore Add all the files you want to ignore in that file.

  5. Git diff
    To know the difference (Modification of files between any two commits). We use the unique ID’s CID
    Syntax: git diff [Commit ID] [Commit ID]
  6. Git diff --staged
    If you want to know the changes between working directory and index commit
    Syntax: git diff –staged
  7. Git log
    We can see the history of commits with different ID’s.
    To do this we use the command git log
    Syntax: git log
  8. Git show
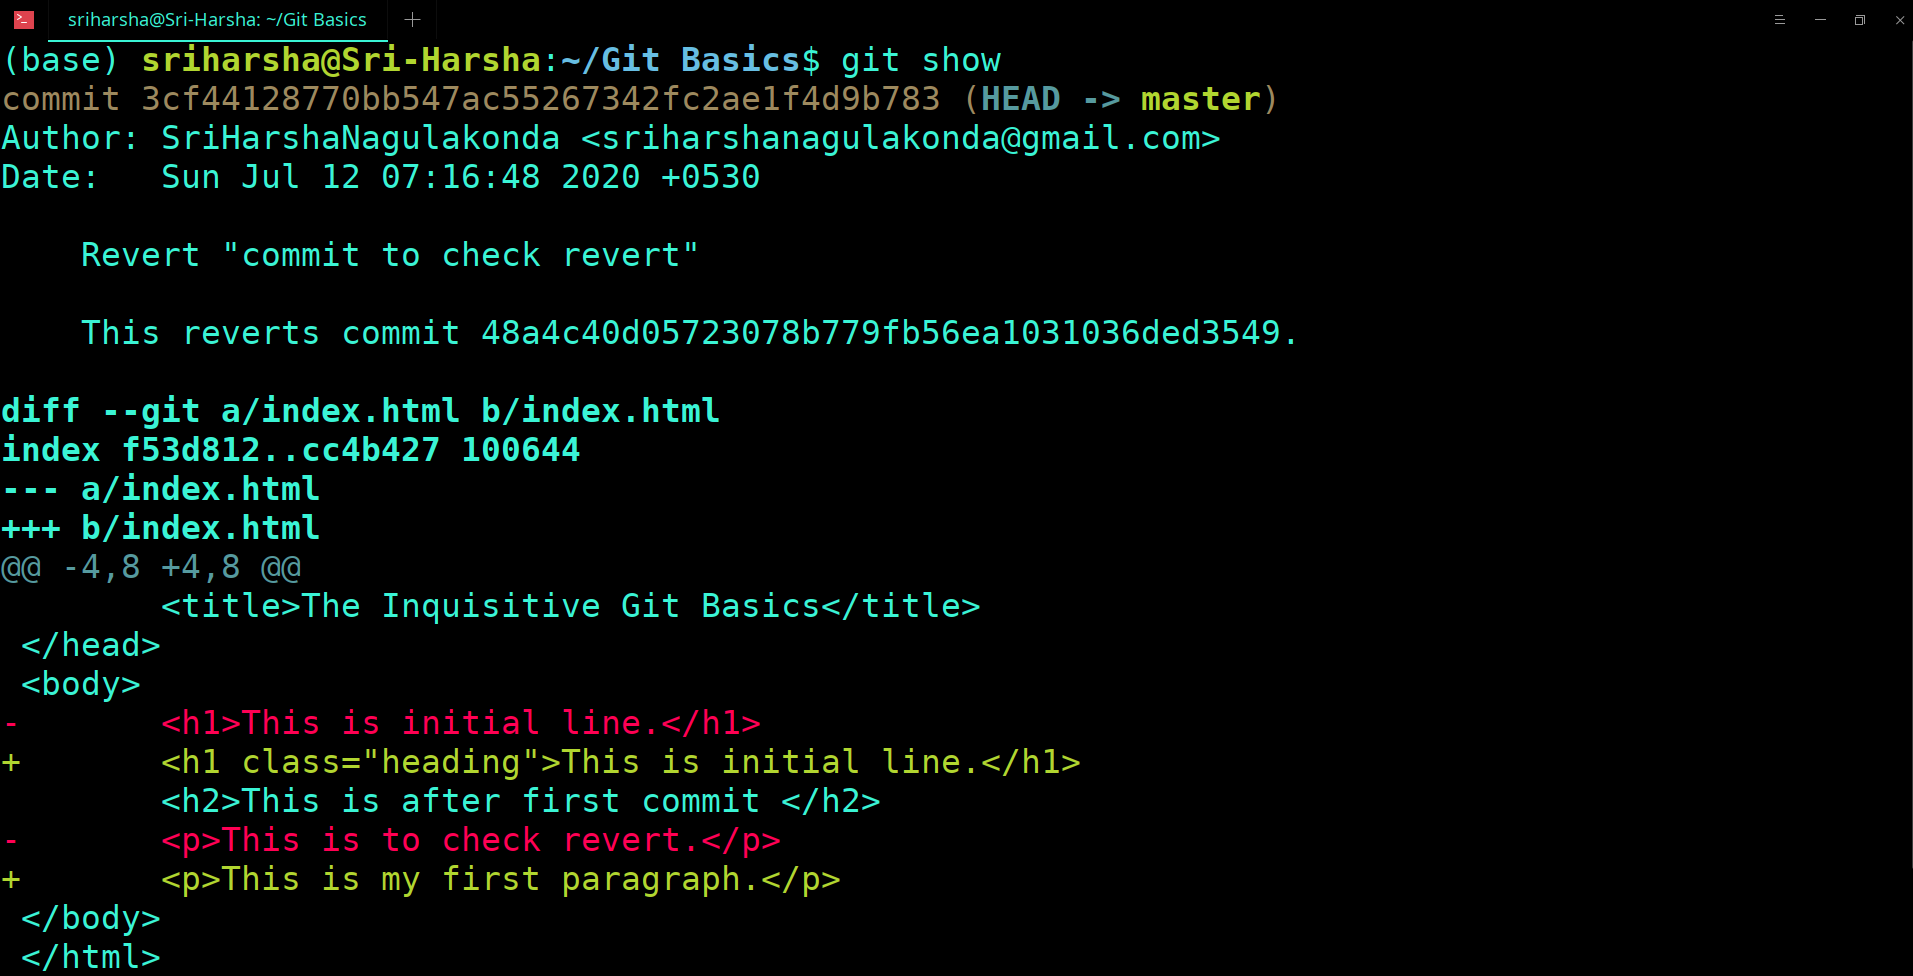
    To display the log message and diff output of the latest commit.
    Syntax: git show [commit]
  9. Git clone
    You can clone the project that you want to work on using the below command. In other words it’s like downloading the copy of the project that you are working on.
    Syntax: git clone <repository_url>
  10. Git push
    To send the committed changes of the local repository to remote repository.
    Syntax: git push <variable_name> <branch>
  11. Git pull
    Pull = (fetch + merge) when you use git pull command
    Syntax: git pull
  12. Git fetch
    which tells your local git to retrieve the latest meta-data info from the original (yet doesn't do any file transferring. It's more like just checking to see if there are any changes available).
    Syntax: git fetch
  13. Git merge
    To keep the local repository up to date we use the command.
    Syntax: git merge
  14. Git branch
    To create the new branch using the command.
    Syntax: git branch <Branch_name> <branch>
  15. Git checkout
    To navigate to a specific branch, need to use this command.
    Syntax: git checkout <branch_name>
  16. Git checkout -b
    We can use a single command which will create the branch and navigate to the created branch in a single step.
    Syntax: git checkout -b <branch_name>
  17. Git reset
    If you want to go back to the previous commits..
    Syntax: git reset [commit ID]
  18. Git reset --soft
    When we use this command, It uncommits the changes but the changes are there in the staging area.
    Syntax: git reset --soft [commit ID]
  19. Git reset --hard
    When we use this command, It uncommits, unstages and deletes the changes with nothing being left.
    We have to be very cautious when using this command because it is a permanent delete and can't be redone
    Syntax: git reset --hard [commit ID]
  20. Git reset --mixed
    this is the default command, which is executed when we run git reset [commit_id]
    When we use this command, It uncommits and unstage the changes, but changes are left in the working tree.
    Syntax: git reset --mixed [commit ID]
  21. Git revert
    To make a new commit which will undo the previous commits until the given commit ID. To get more clarity refer the scenario 1
    Syntax: git revert [commit ID]
  22. Git rebase
    Command rebasing re-writes the project history by creating brand new commits for each commit in the original branch.
    Syntax: git rebase <branch_name>


More Commands on GIT
  1. Git config
  2. Git restore
  3. Git rm
  4. Git mv
  5. Git switch
  6. Git mergetool
  7. Git stash
  8. Git difftool
  9. Git describe
  10. Git shortlog
  11. Git apply
  12. Git cherry-pick
  13. Git bisect
  14. Git blame
  15. Git grep
References

Scenario-1

  1. Initialise with empty repository
    Use the git init.
    Syntax : git init

    GIT INIT

    After initialising a repository, a hidden subdirectory called .git is created.
    Create a New folder and add some files to it (Here in this example: index.html, demo1.txt, demo2.txt)
    GIT INIT2

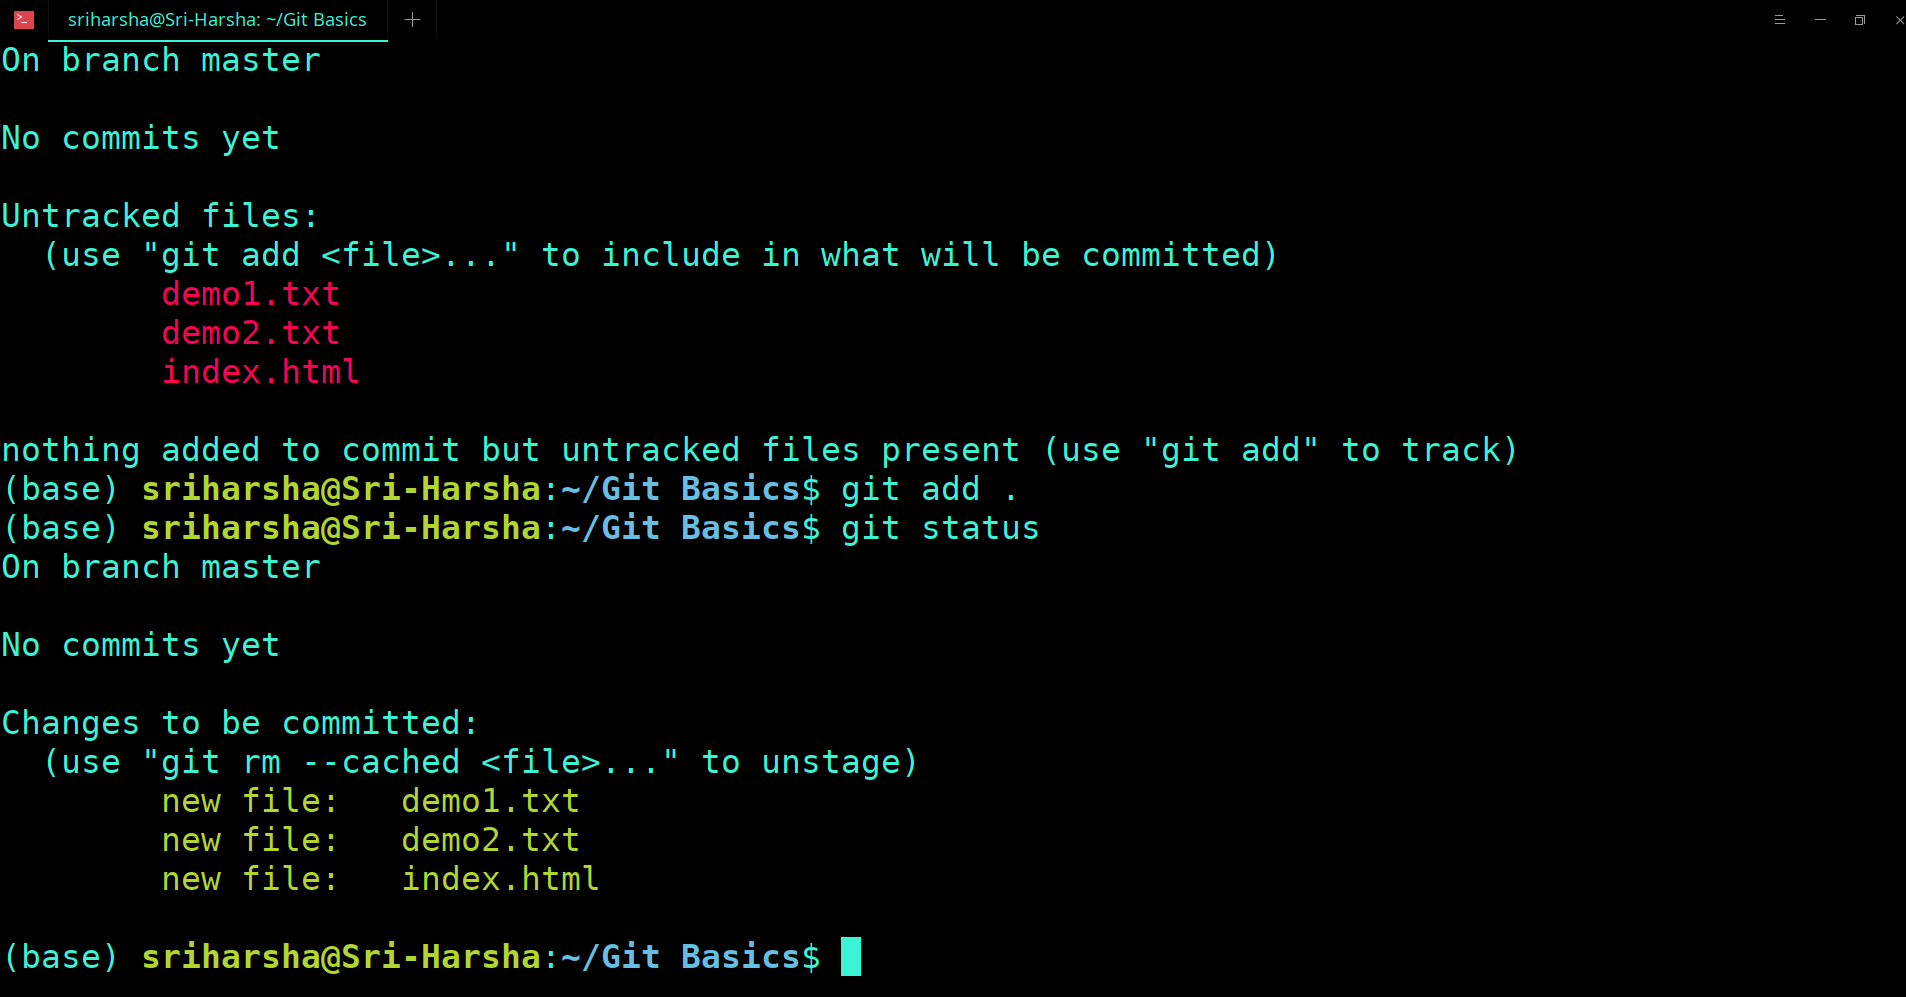
  2. Now check the status of the git repository with command, git status.
    Syntax : git status

    GIT STATUS

    Here you can observe 3 files changed.
    Now add the files to staging area .

  3. To do this you can use the command git add
    Syntax : git add <file_name>

    can be used to add a specific file to staging area.
    Syntax : git add .

    can be used to add all the files in the working directory to the staging area.
    GIT ADD

  4. Now you can commit the changes. For our future reference we can give a message
    Syntax : git commit -m “[commit message]”

    After git commit, files in the staging area are moved to local repository.
    Note: It’s not mandatory give the message. Just for our future reference.
    GIT COMMIT
    If you don’t want to give any message, then you can simply use git commit
    GIT COMMIT
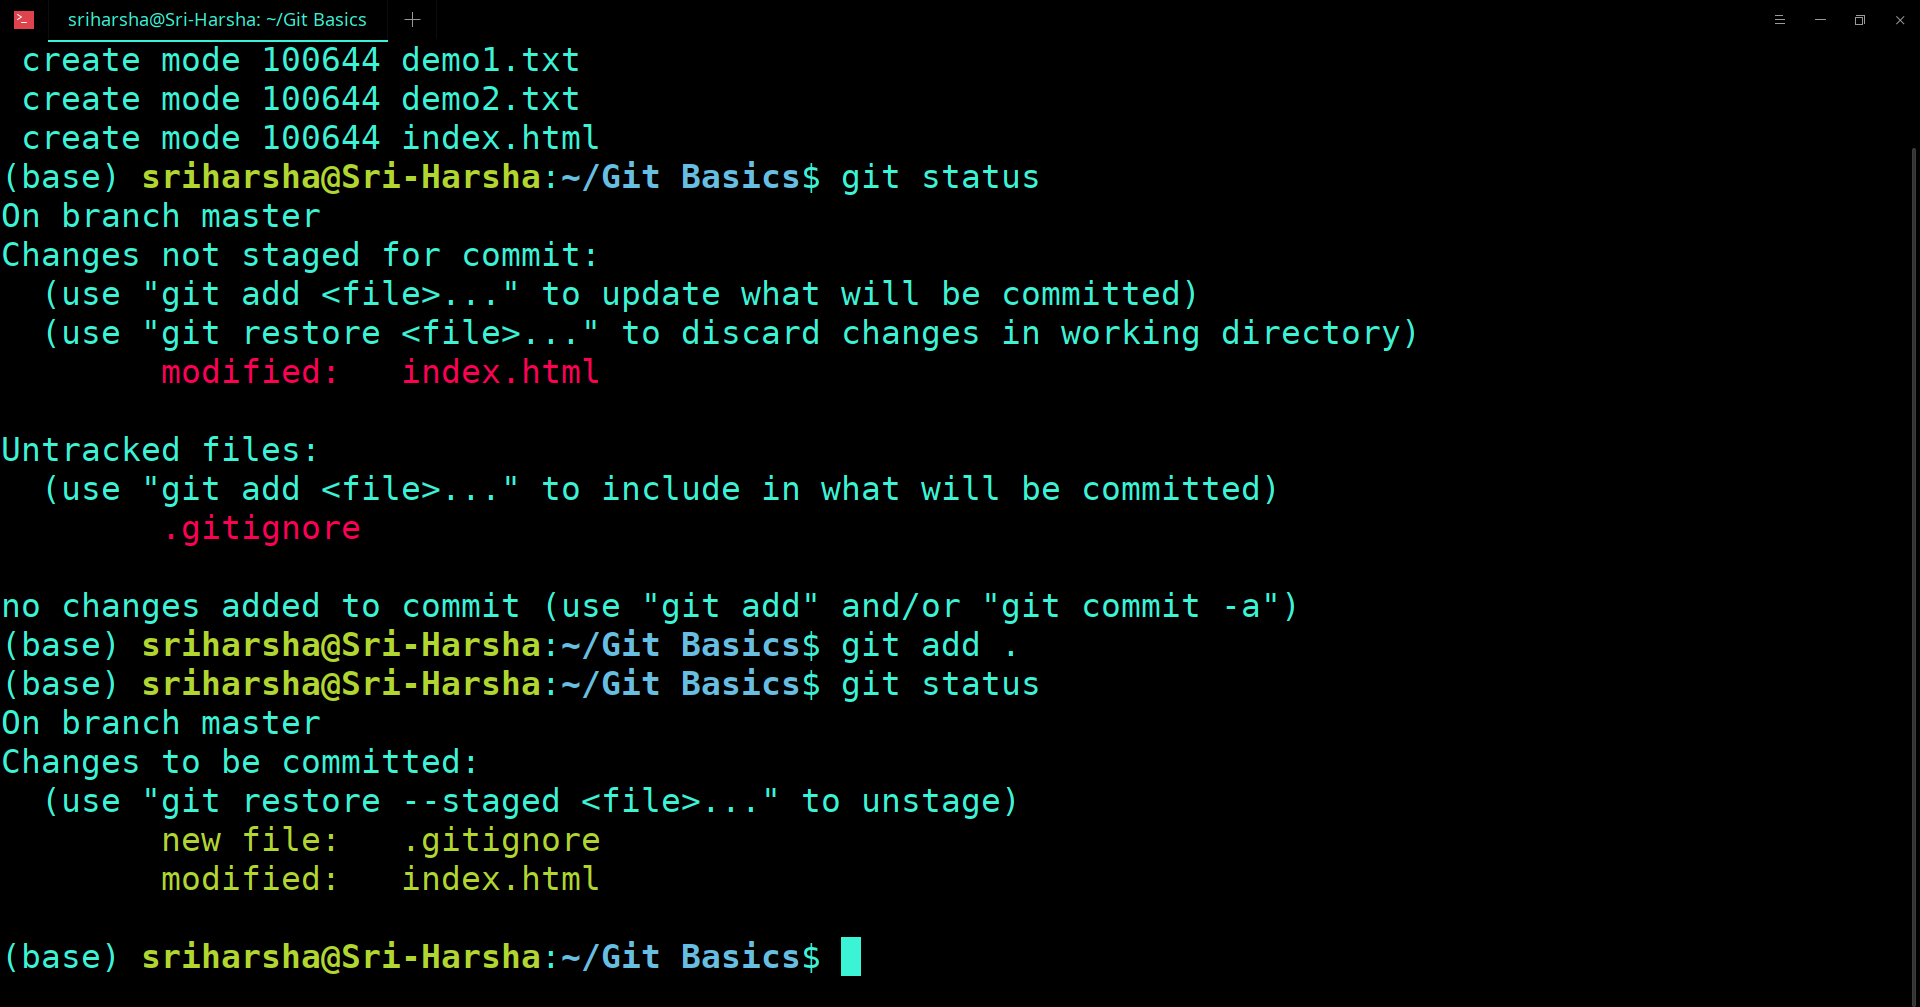
  5. Now add some files into our project. (styles.css)
    If you want to ignore any files, then create a text file with name .gitignore

    In this file, you can write the file names that you want to ignore and in the commit process those files won’t be added in the repository.
    GIT IGNORE
    Now you can check, status, add them to the staging area.
    GIT IGNORE
    Here we can see that the file we wrote in .gitignore i.e., styles.css is not added into the staging area.
    GIT IGNORE
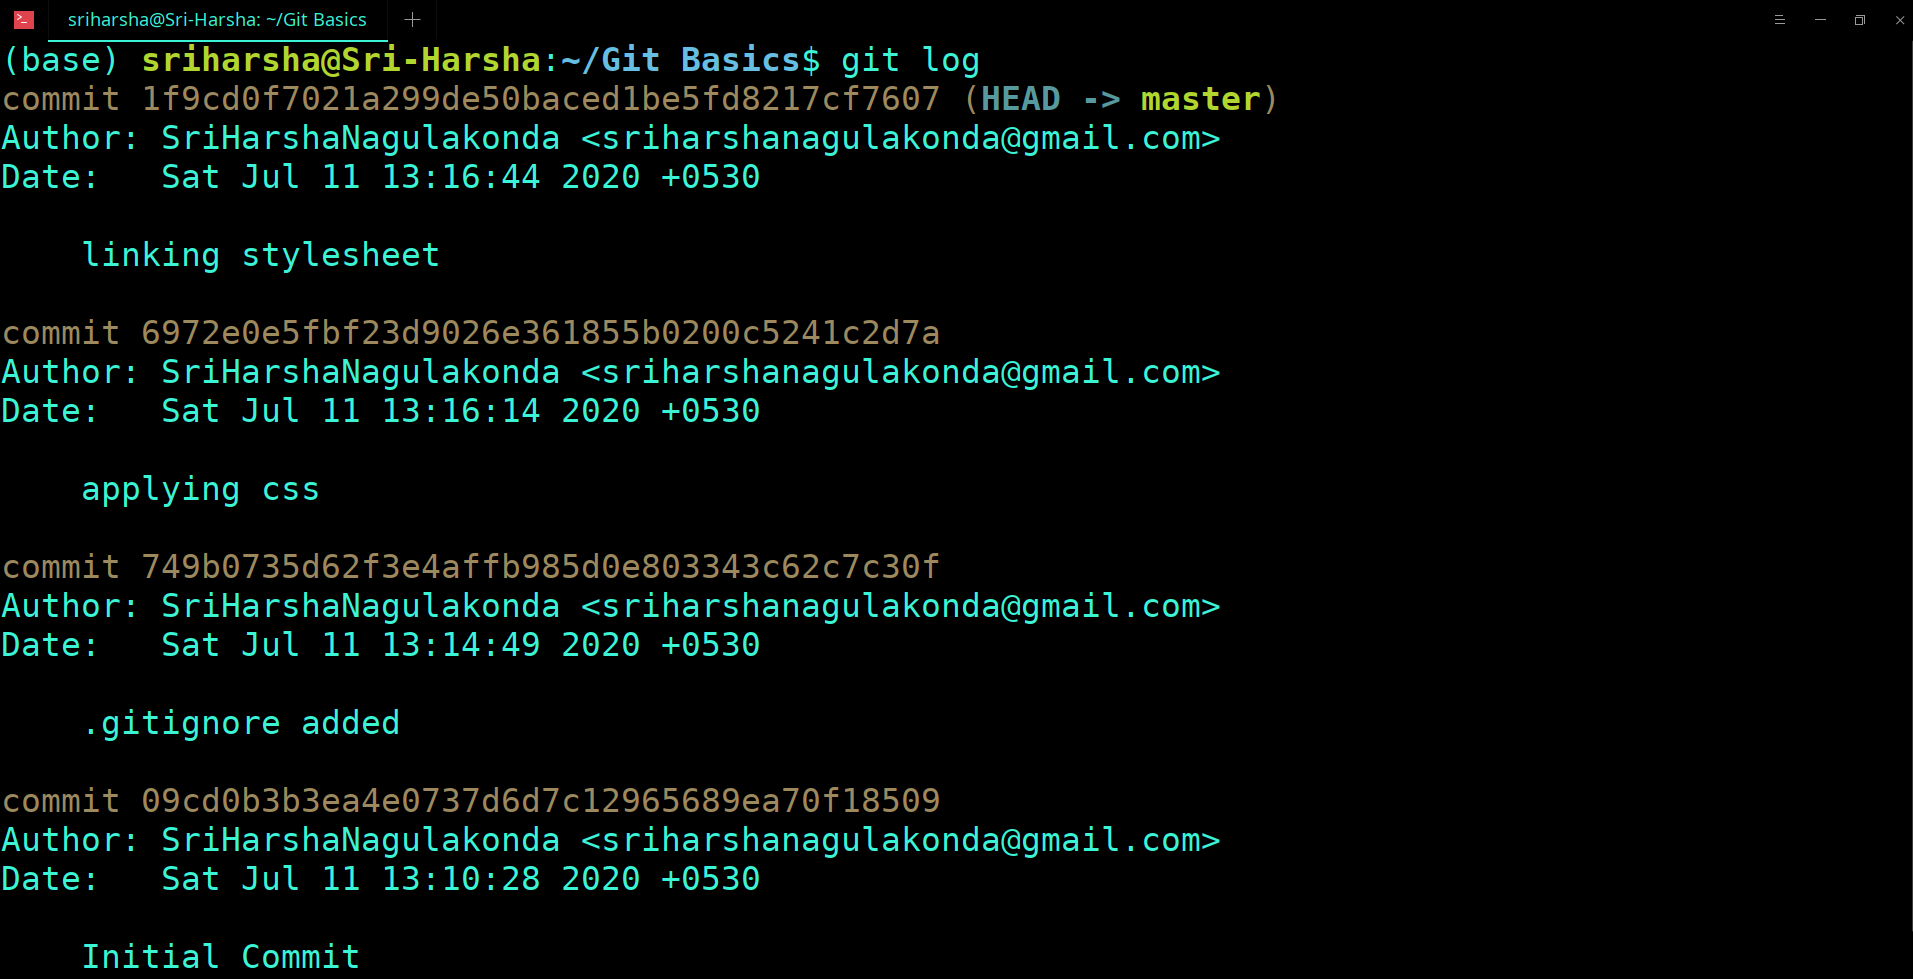
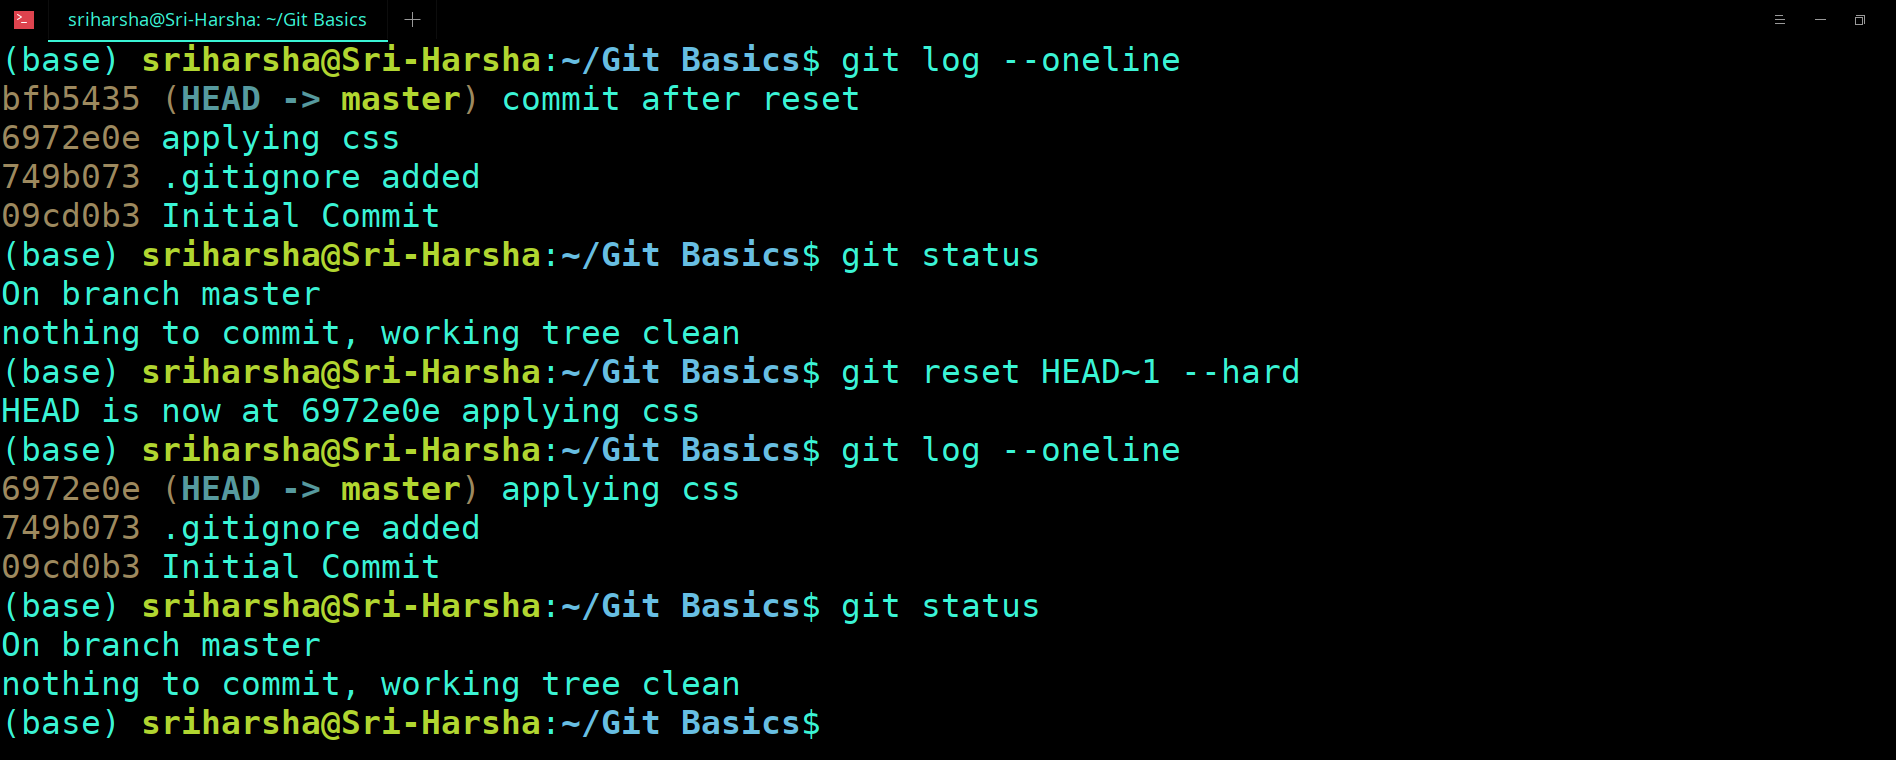
  6. So far, we have done 2 commits. We can see the history of commits with different ID’s.
    To do this we use the command git log
    Syntax : git log
    GIT LOG
    git log gives a detailed history of commits with Author name and Date, time etc. To know only the list of commits with commit id’s we can use git log --oneline.
    Syntax : git log --oneline

    We can also get a graph of all the commits with the command git log --graph --oneline --all
    Syntax : git log --graph --oneline --all

    This is command is very useful for visualization of large no. of commits with different branches.
    GIT LOGONLINEALL
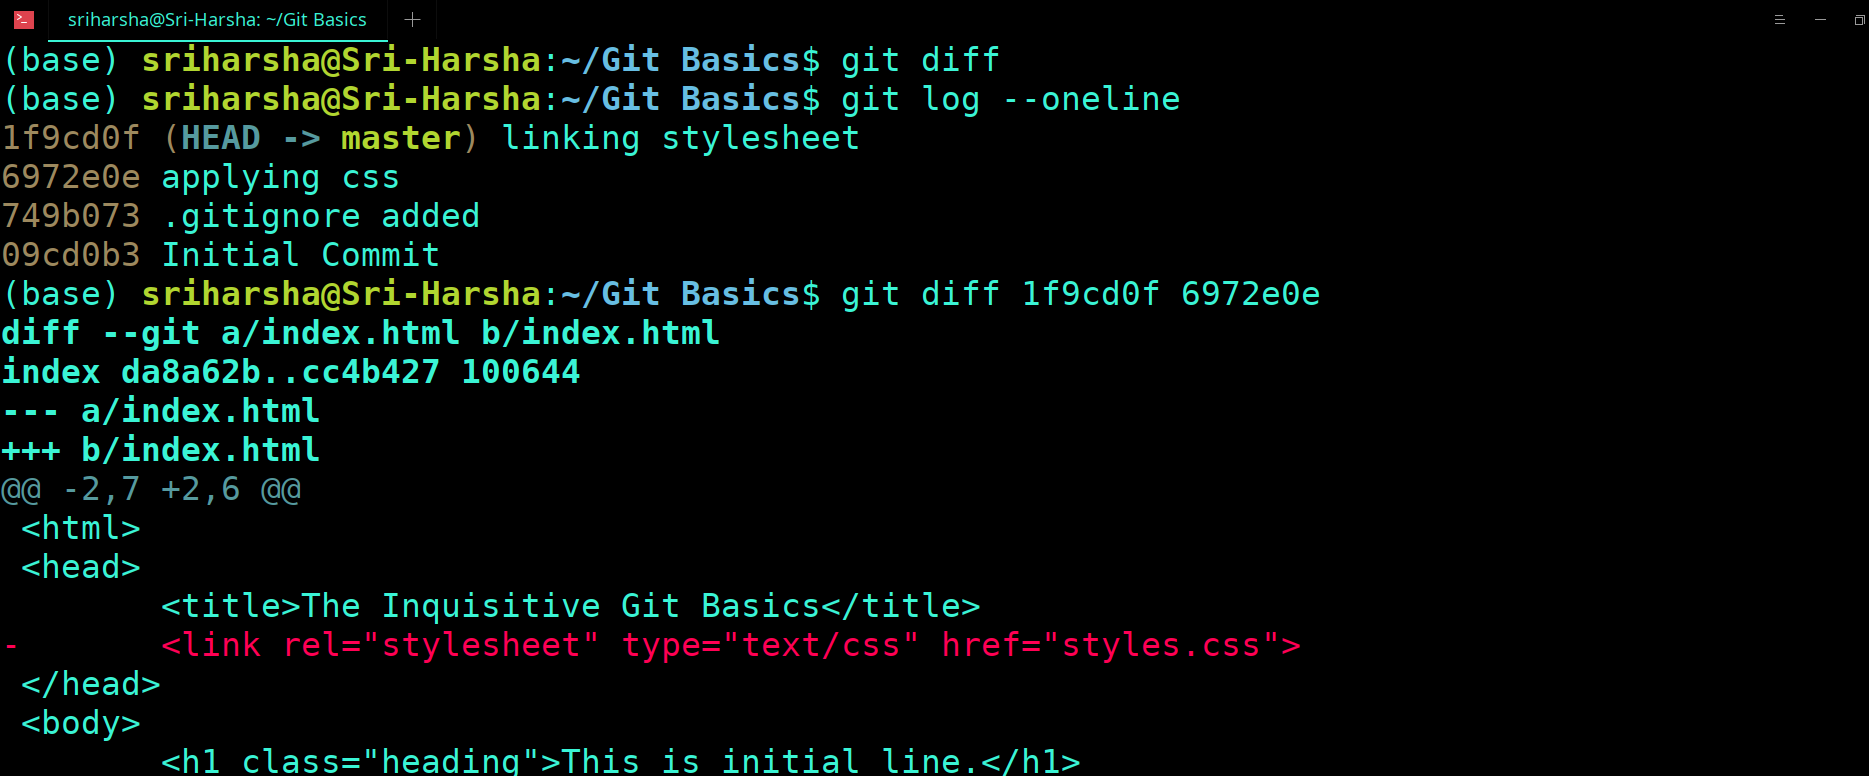
  7. To know the difference (Modification of files between any two commits). We use the unique ID’s CID
    Syntax :git diff [Commit ID] [Commit ID]

    git diff cid1 cid2(We need to give 2 arguments i.e commit id’s)
    GIT DIFF
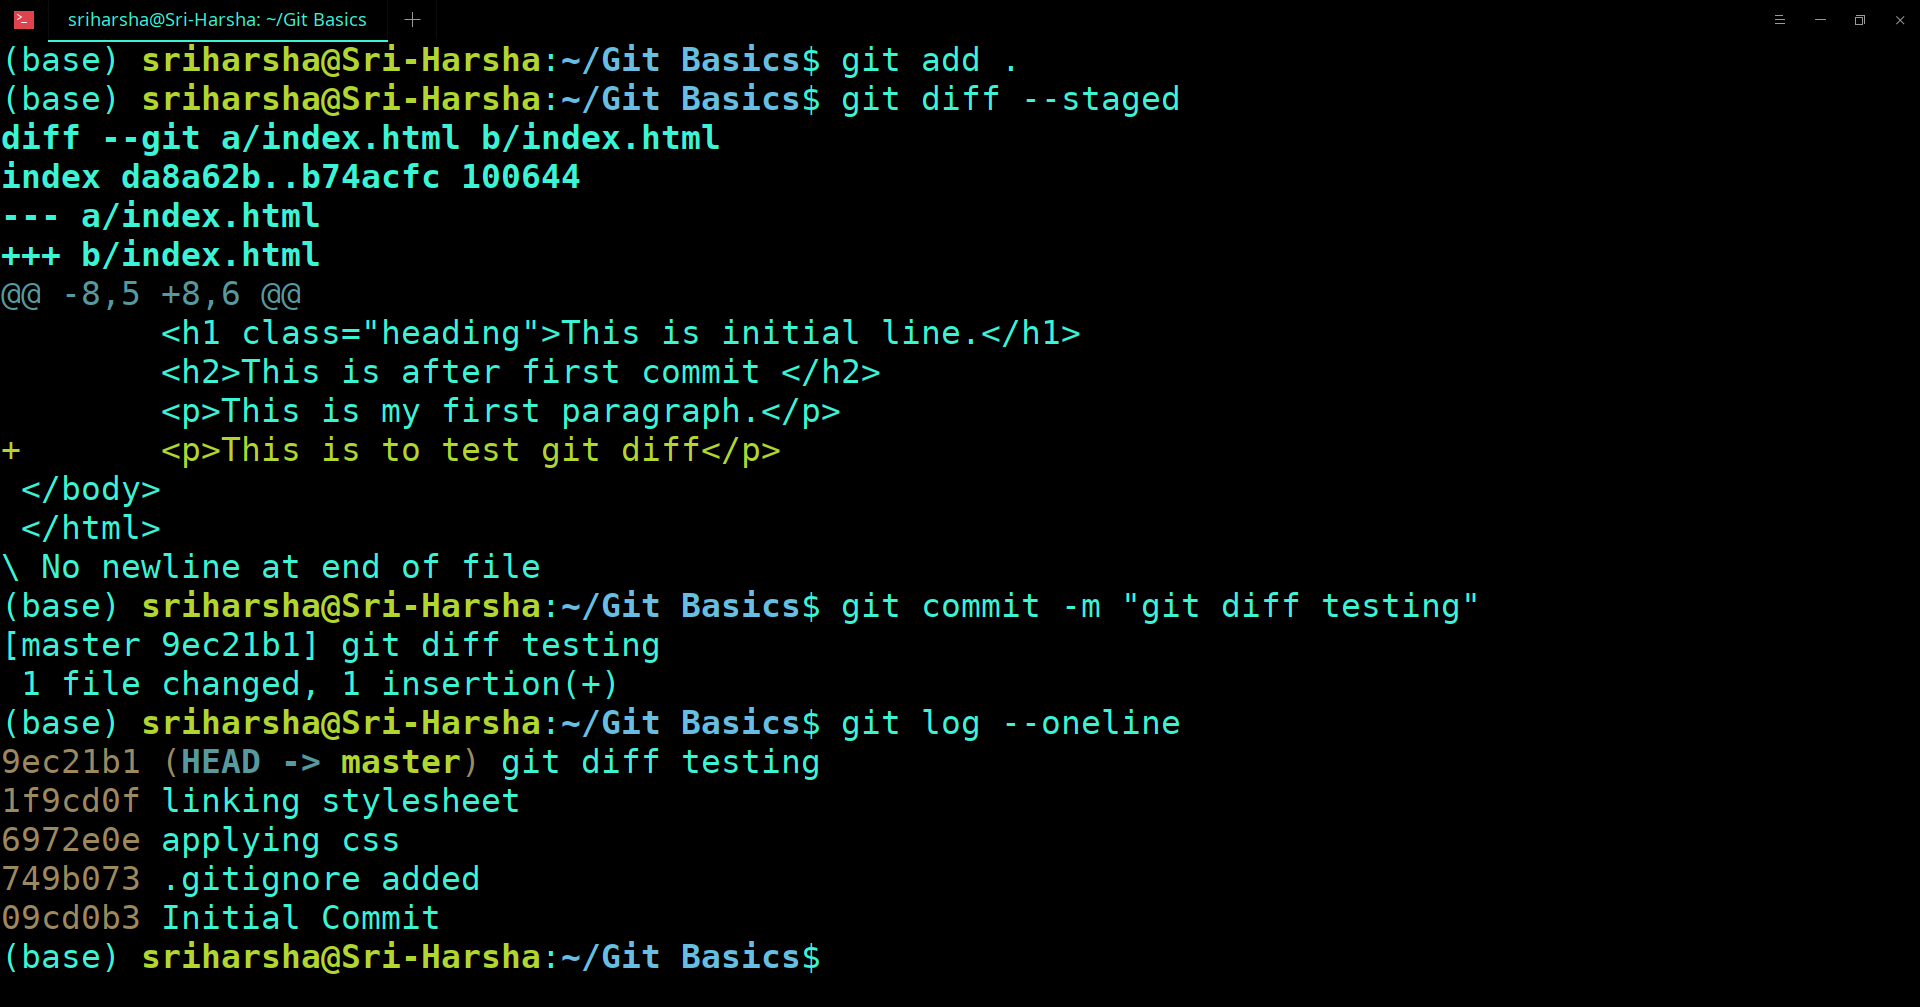
  8. If you want to know the changes between working directory and index commit.
    GIT STAGED AREA
    Now let’s change in the index.html file and run this command to know the changes.
    Syntax : git diff --staged

    git diff --staged
    GIT STAGED AREA
  9. If you want to go back to the previous commits. You can use git reset
    git reset has many variations. Commonly used are --soft, --mixed, --hard.
    Syntax : git reset [commit ID]

    git reset <commit_id> <parameter>
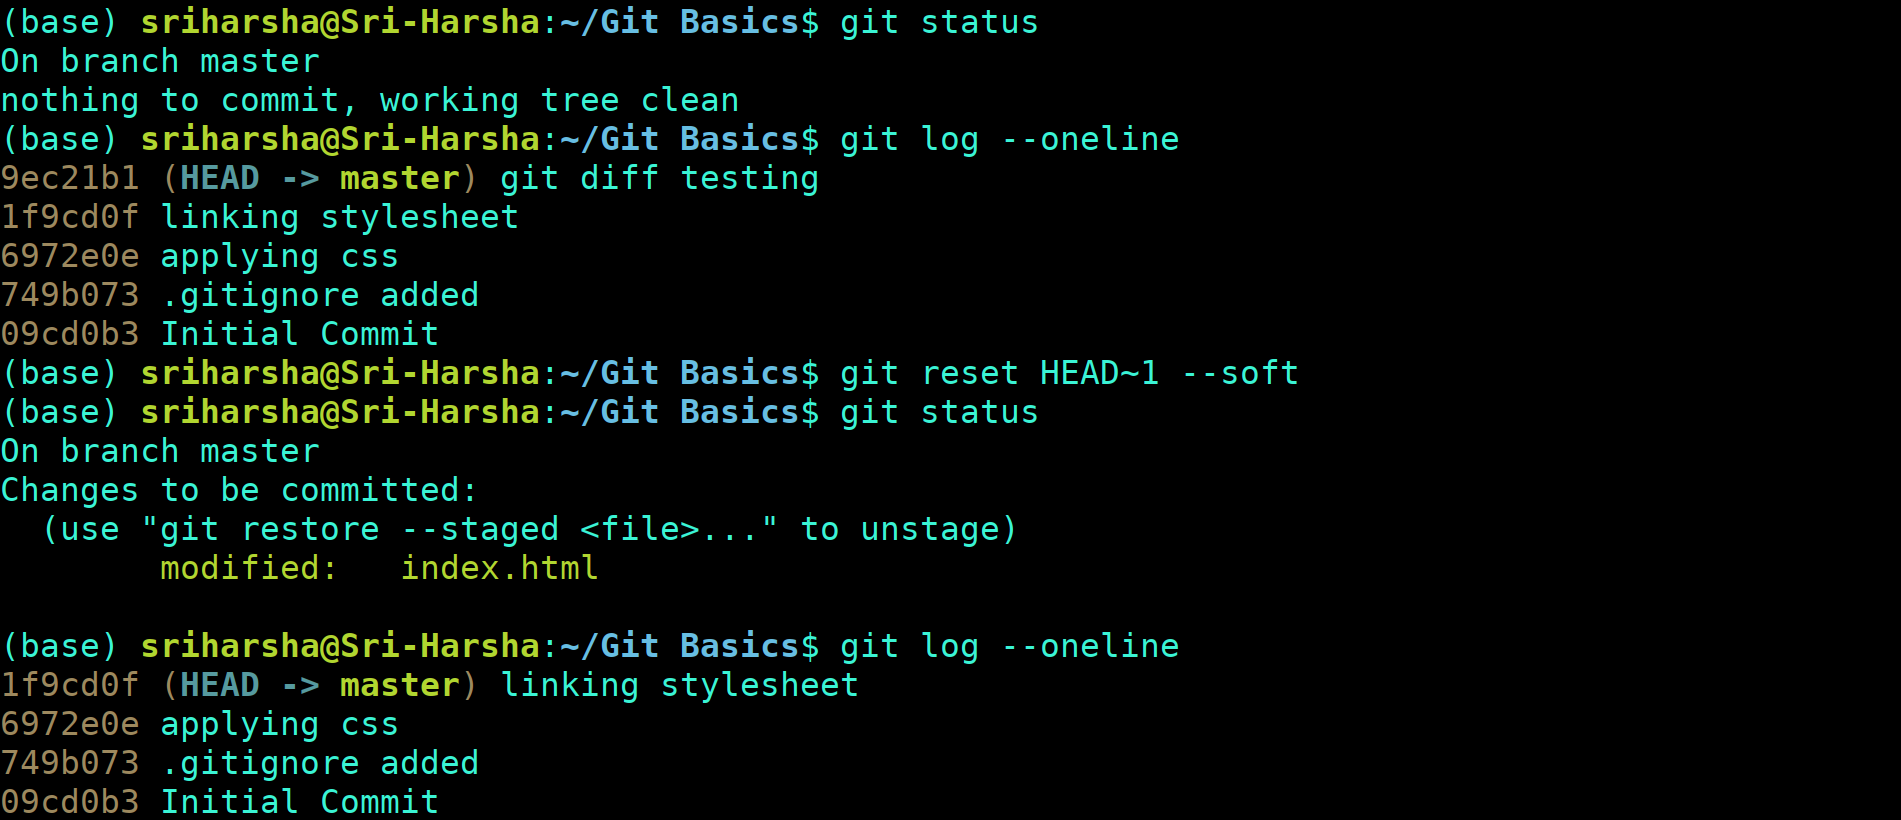
    Syntax : git reset --soft [commit ID]

    git reset --soft
    GIT RESET SOFT
    When we use this command, It uncommits the changes but the changes are there in the staging area.
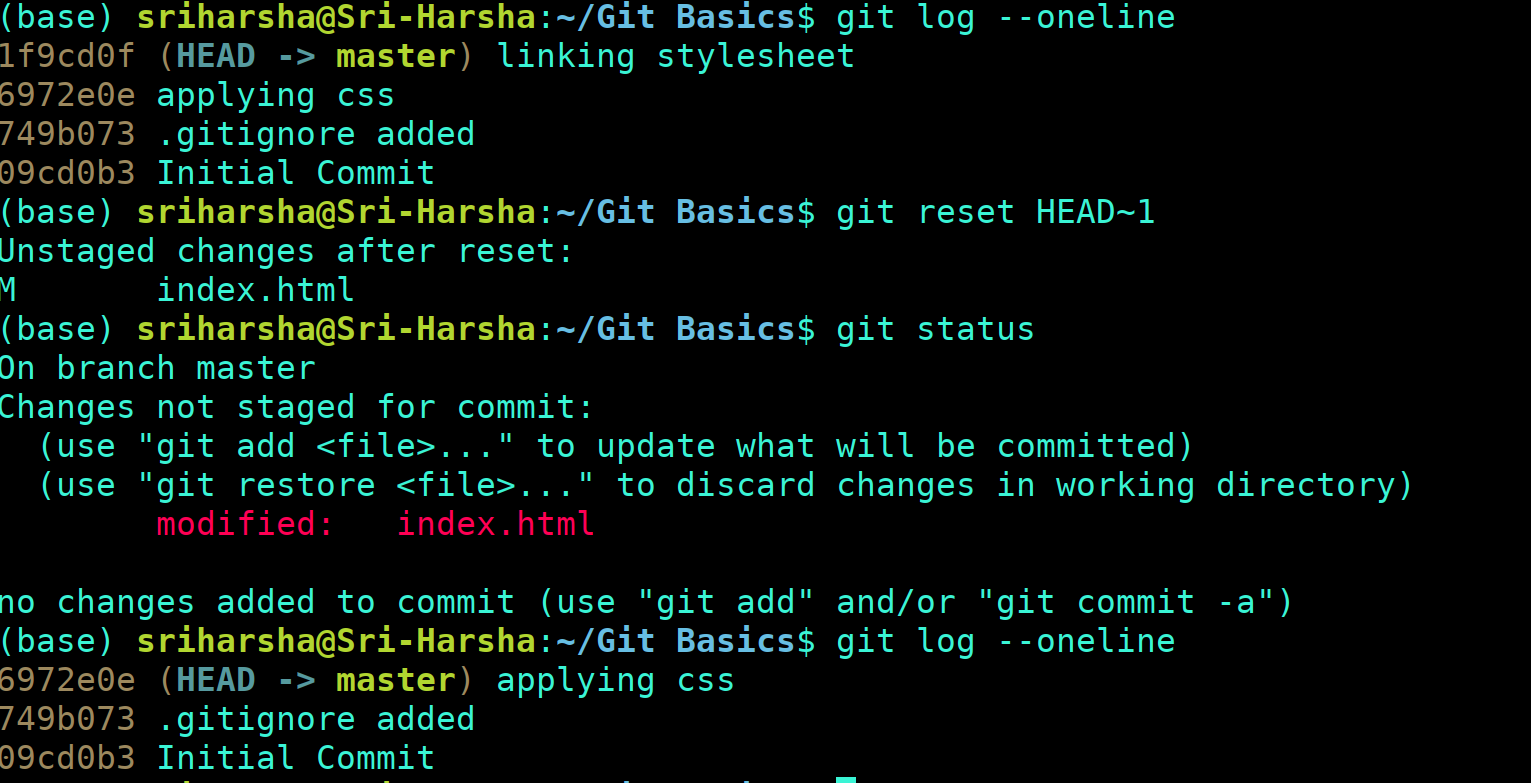
    git reset --mixed
    Syntax : git reset --mixed [commit ID]

    this is the default command, which is executed when we run git reset
    When we use this command, It uncommits and unstage the changes, but changes are left in working tree.
    GIT RESET MIXED
    git reset --hard
    Syntax :git reset –hard [commit]

    When we use this command, It uncommits, unstage and delete the changes, nothing left.
    This is very dangerous command. This is a permanent delete. We can't redo.
    GIT BEFORE RESET HARD

    This is index.html before using the command.
    GIT RESET HARD
    The commit is deleted, file is not there in staging area of working directory.
  10. You can also use git revert command, to make a new commit of all previous commits to undo if you want.
    GIT REVERT
    This is the modified index.html.
    Now let’s revert this back to original version of index.html.
    Syntax : git revert [commit ID]
    GIT CHECK REVERT

    GIT  REVERT

    GIT  AFTER REVERT
    We can see that there is another commit undoing previous commit.
  11. To display the log message and diff output of the latest commit. You can use
    Syntax : git show [commit]

    git-show
    GIT SHOW

Scenario-2

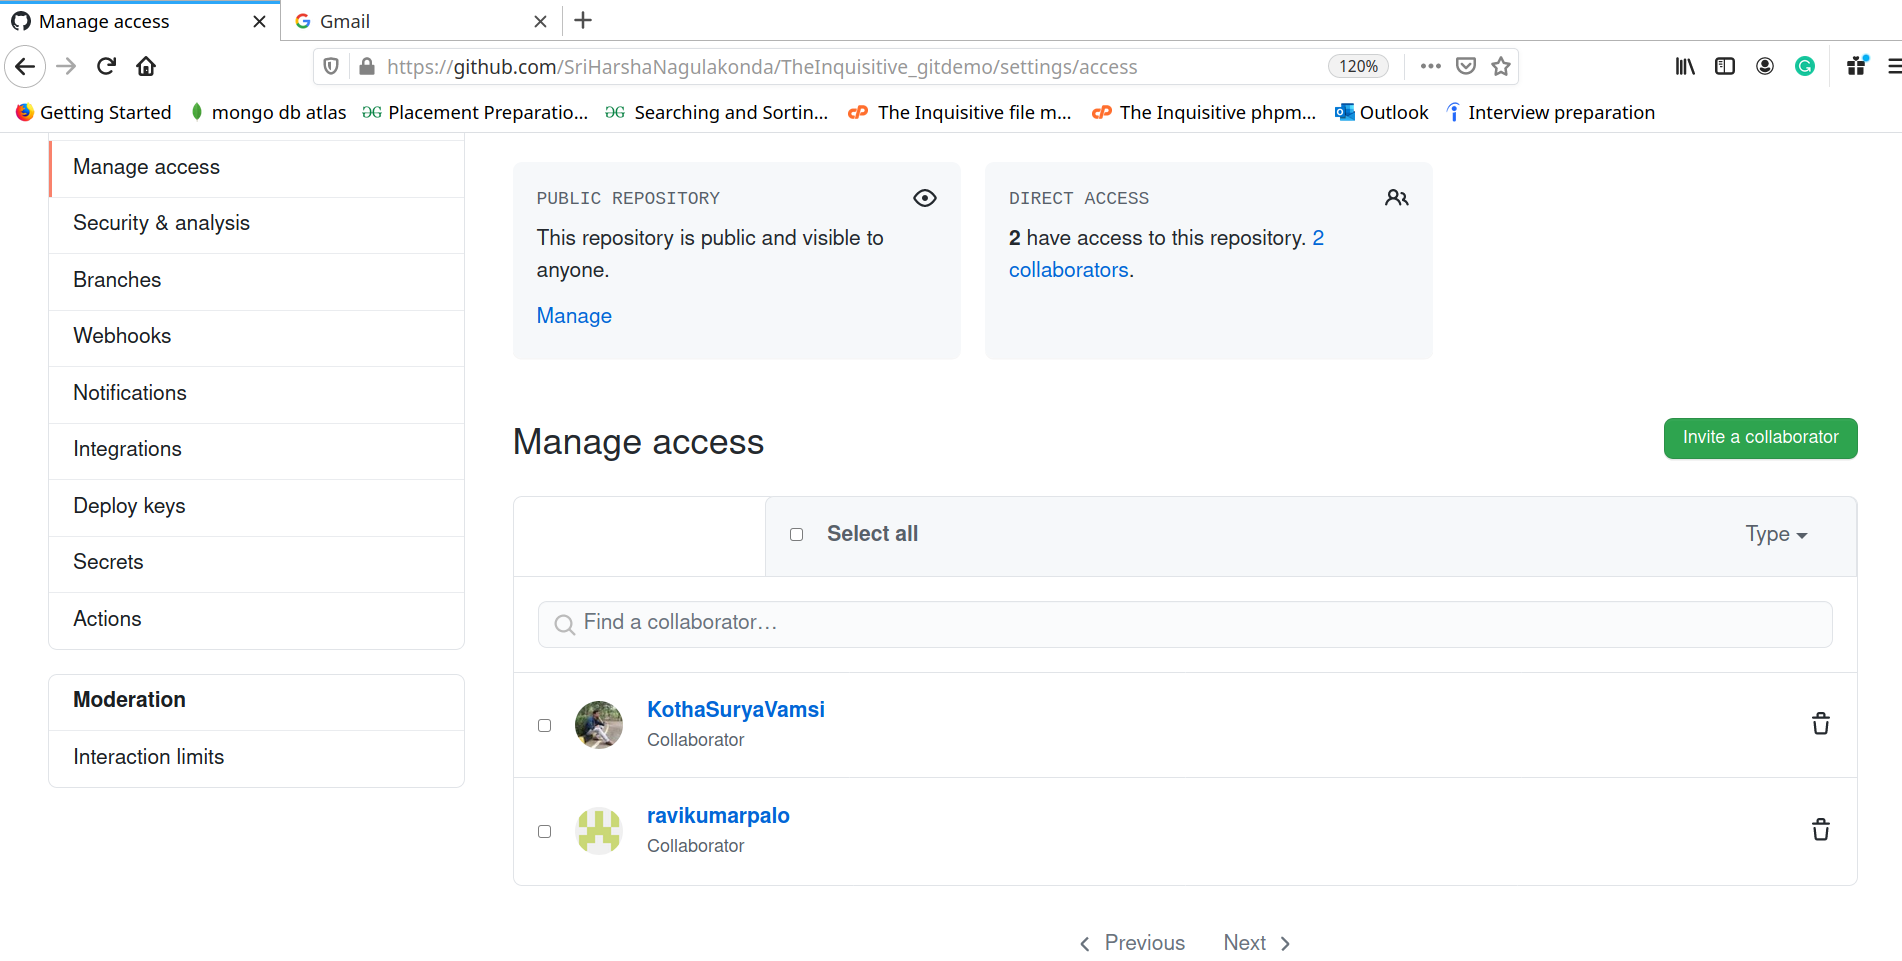
  1. Let’s imagine there are 2 collaborators working for a remote repository.
    (To show the demo we are using TheInquisitive_gitdemo). There are 2 collaborators other than the owner (Harsha).
    GIT REPOSITORY

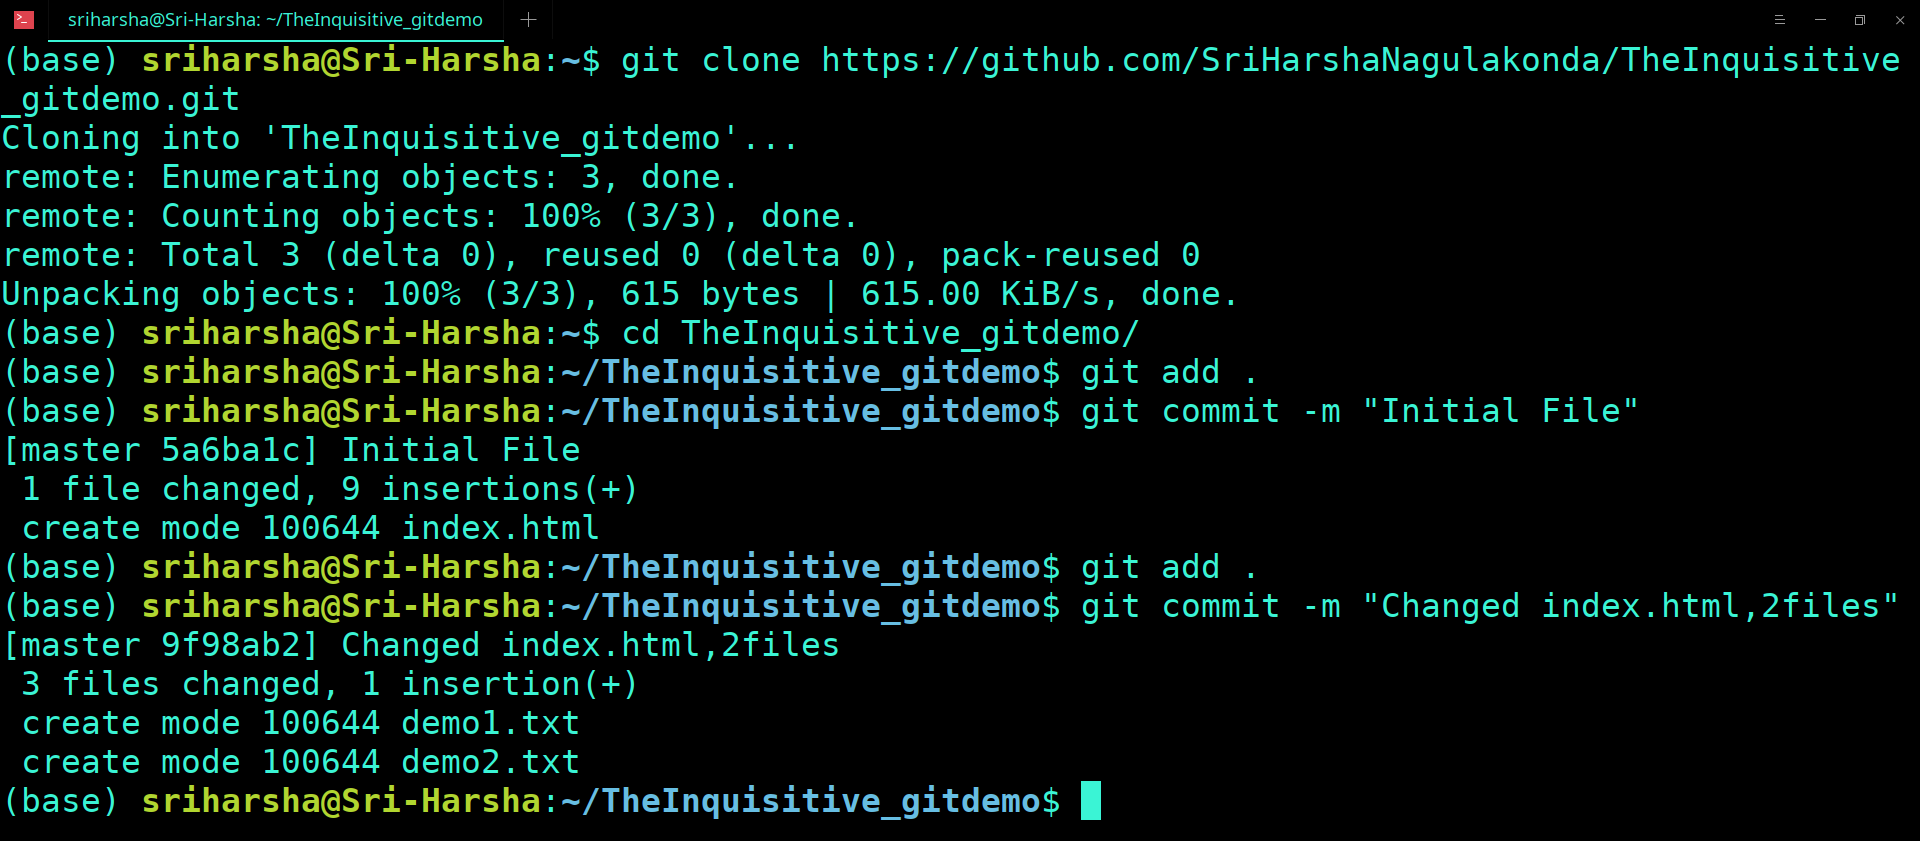
  2. First, we need to clone the project that you want to work on. Using the below command
    Syntax : git clone <repository_url>

    git clone
    " https://github.com/SriHarshaNagulakonda/TheInquisitive_gitdemo.git
    GIT CLONE

    Like git init, cloning is generally a one-time operation. Once a developer has obtained a working copy, all version control operations and collaborations are managed through their local repository.
    GIT AFTER CLONE

  3. Collaborator1(Harsha in this example) has made some changes to files (index.html, demo1.txt, demo2.txt), added to staging area and committed.
    GIT COMMIT BY COLLOBORATOR 1

  4. Collaborator1(Harsha) want to push the changes to remote repository from local repository. (Files)
    Using the commands
    To connect local repository to remote repository. git remote add origin
    Syntax: git remote add origin

    https://github.com/SriHarshaNagulakonda/TheInquisitive_gitdemo.git
    GIT REMOTE ORIGIN BY COLLOBORATOR 1

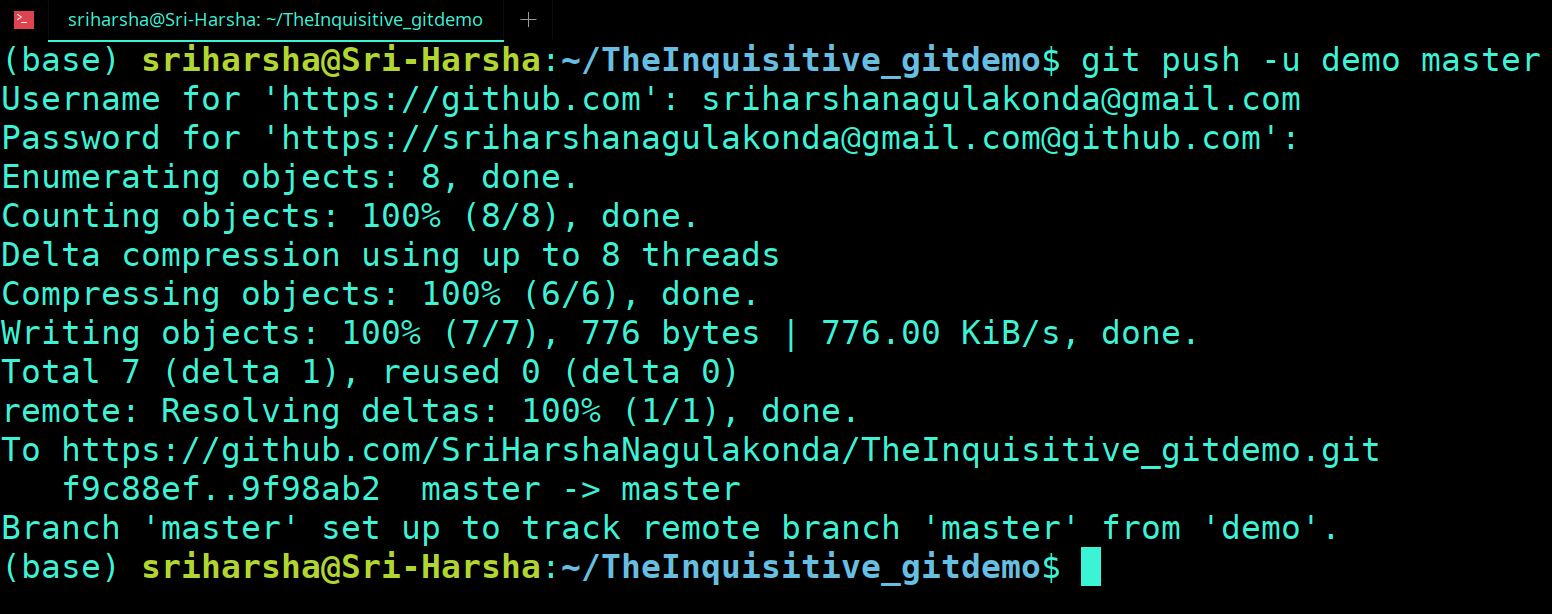
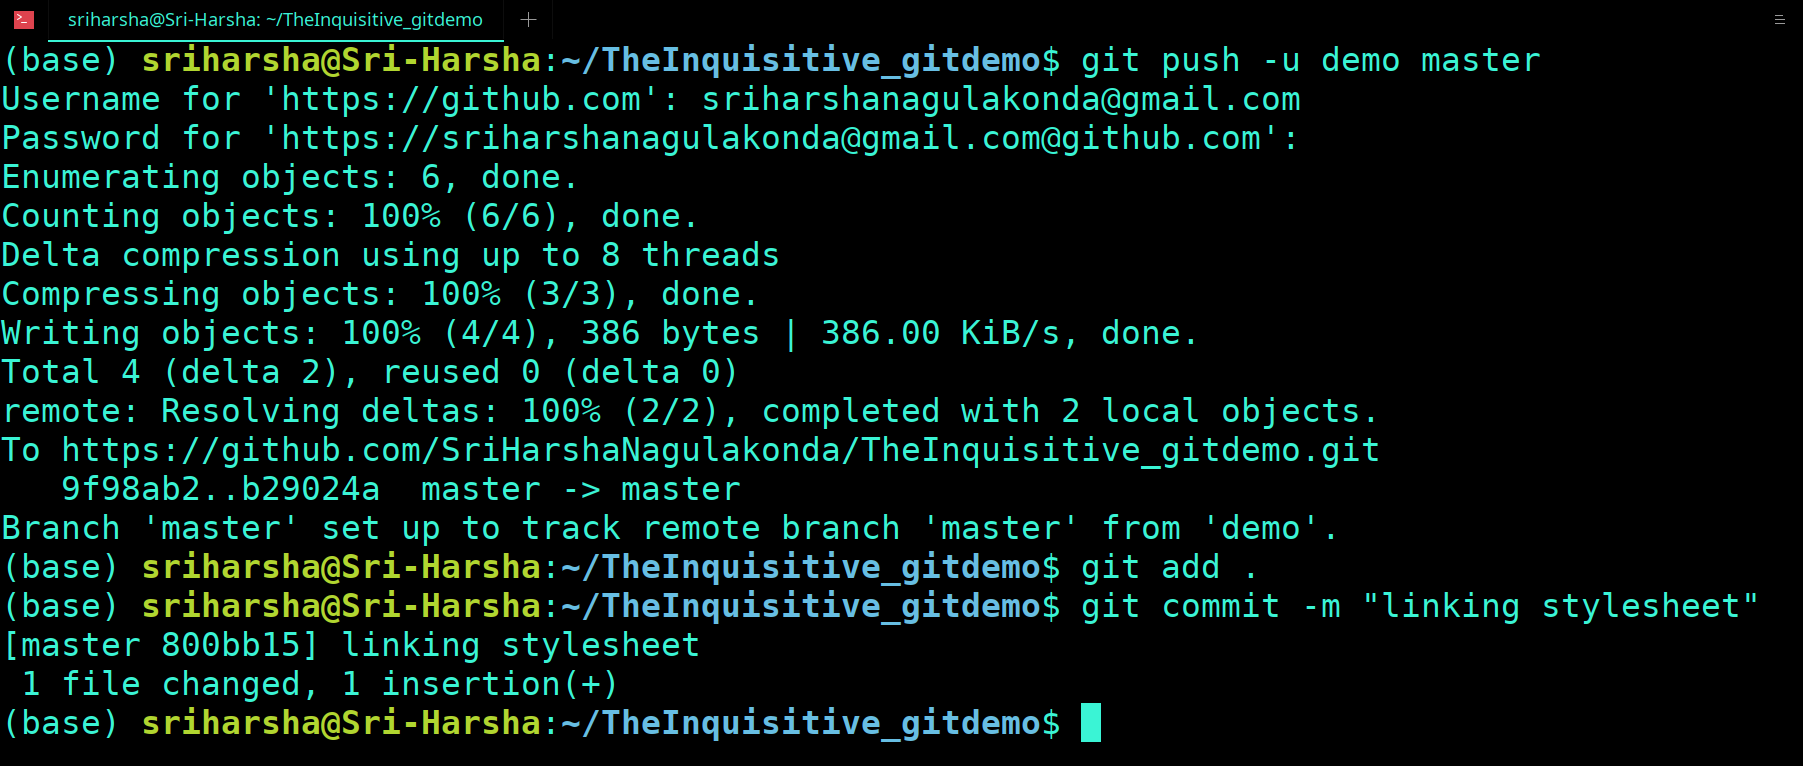
    To send the commited changes of the master branch from local repository to remote repository. git push -u origin master
    Syntax : git push

    GIT PUSH BY COLLOBORATOR 1
  5. At the same time, consider Collaborator2 (RaviKumar) has added some files in his local repository.
    GIT COMMIT BY COLLOBORATOR 2
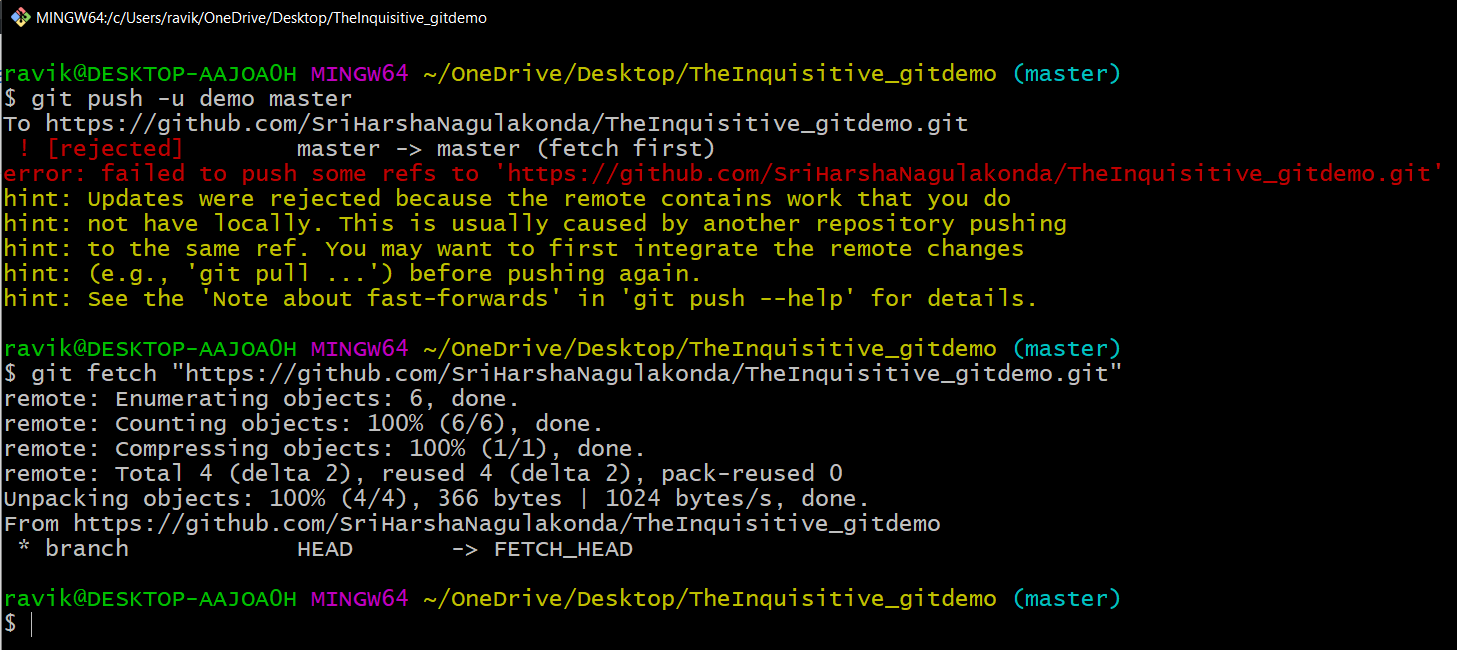
    When Collaborator2 (RaviKumar) tries to push the changes to remote repository using the command git push.
    It will prompt as an error as “updates are rejected because remote contains work you don’t have locally”
    GIT PUSH BY COLLOBORATOR 2
    Reason is local repository is not up to date, at the time of pushing from local repository to remote repository.
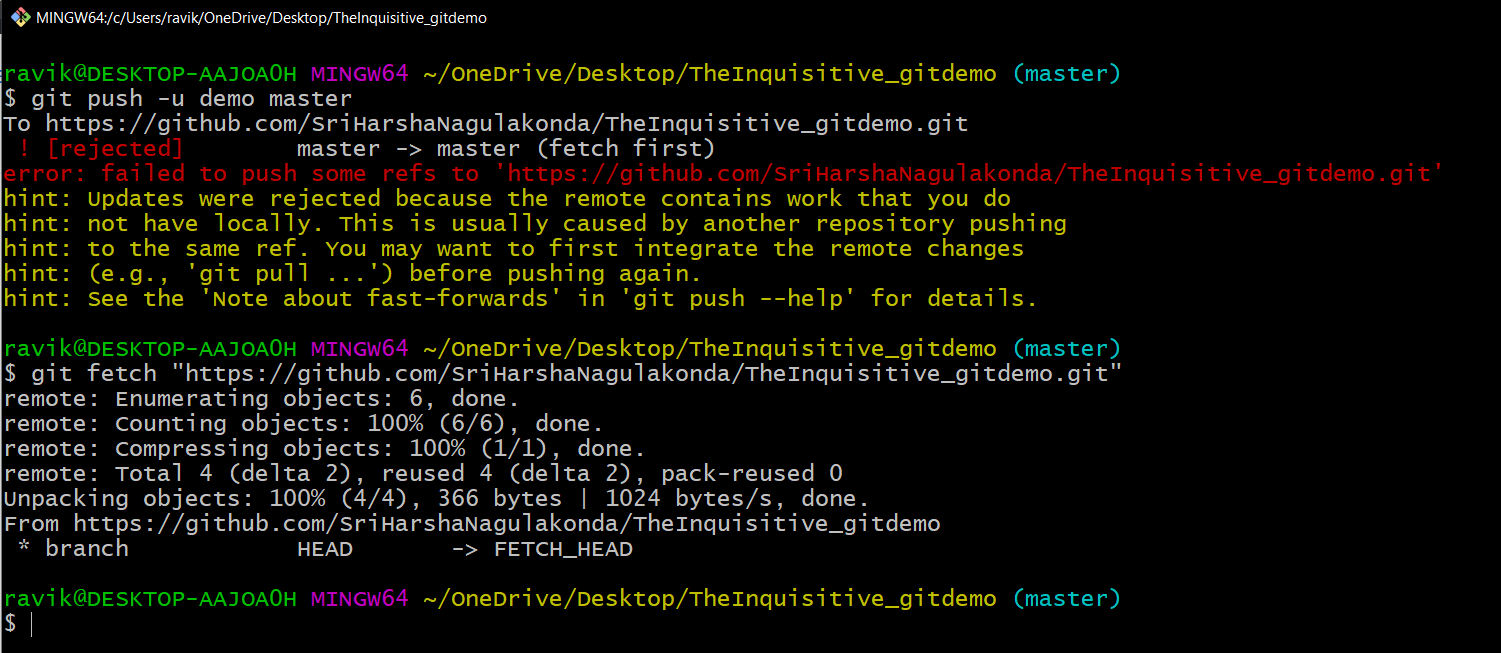
    To know the changes, need to use this command git fetch.
    Syntax : git fetch <repository_url>
    Note: git fetch is the command that tells your local git to retrieve the latest meta-data info from the original (yet doesn't do any file transferring. It's more like just checking to see if there are any changes available).
    GIT FETCH BY COLLOBORATOR 2
    Once he use the git fetch command, It shows that his “local commit is 1 step behind the remote repo commits”.
    GIT AFTER FETCH
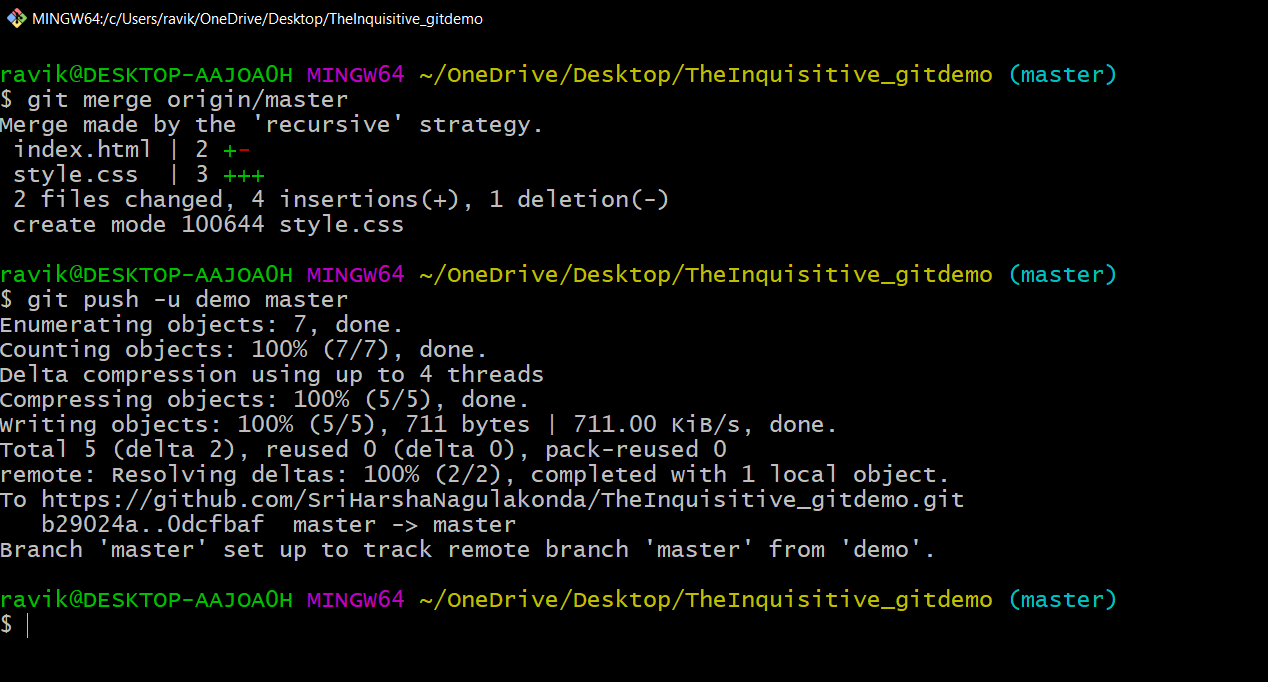
  6. From above command, It will also show in which files the changes are not up to date. To keep the local repository up to date we use the command git merge
    Syntax : git merge <branch_name>
    GIT MERGE BY COLLOBORATOR 2
    Git merge command will merge both local repository and remote repository. Ensure that local repository is up to date.
  7. Now, Collaborator2 (RaviKumar) will push the changes to remote repository. This time the changes are updated in the remote repository will be successful without prompting any errors.
    GIT COMMIT BY COLLOBORATOR 2
  8. Commit needs to be updated in the local repository of collaborator1
    GIT COMMIT NEED TO ADD TO  COLLOBORATOR 1
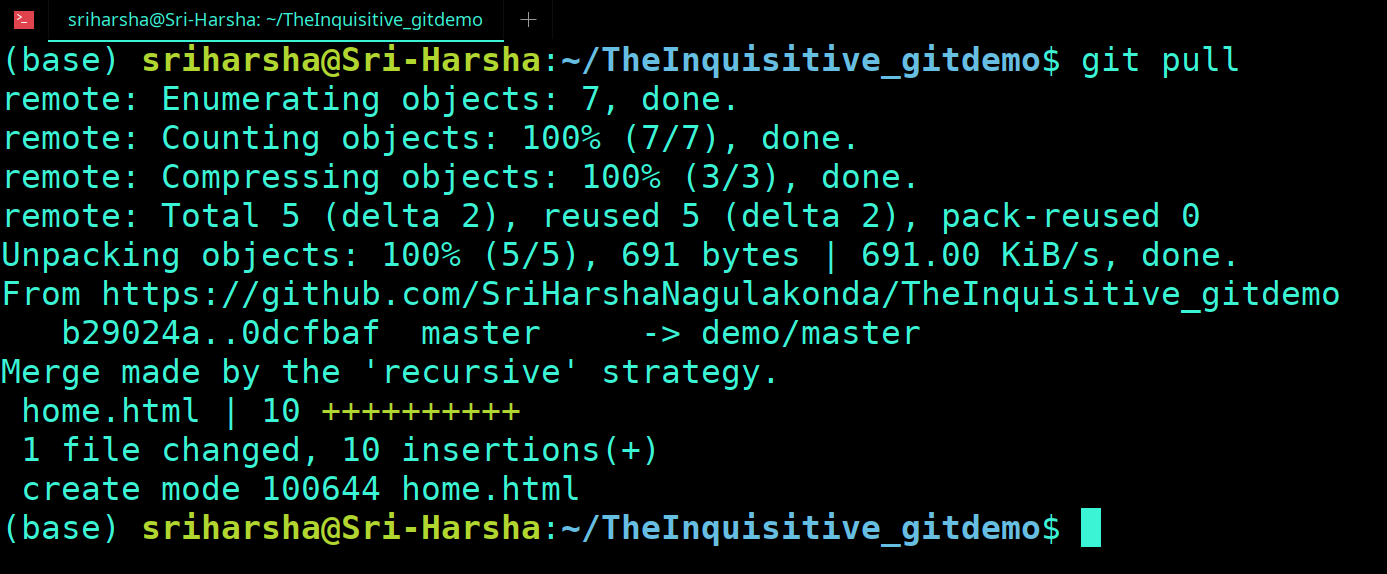
  9. Collaborator1(Harsha) knows that some changes are done in the remote repository, then he can directly use the git pull.
    Syntax : git pull
    Pull = (fetch + merge) when you use git pull command. It will do both operations, i.e it will fetch the latest updates from remote repository and if there are local repository is not up to date, then it will do the merge. To ensure both local and remote repository is up to date.
    GIT PULL
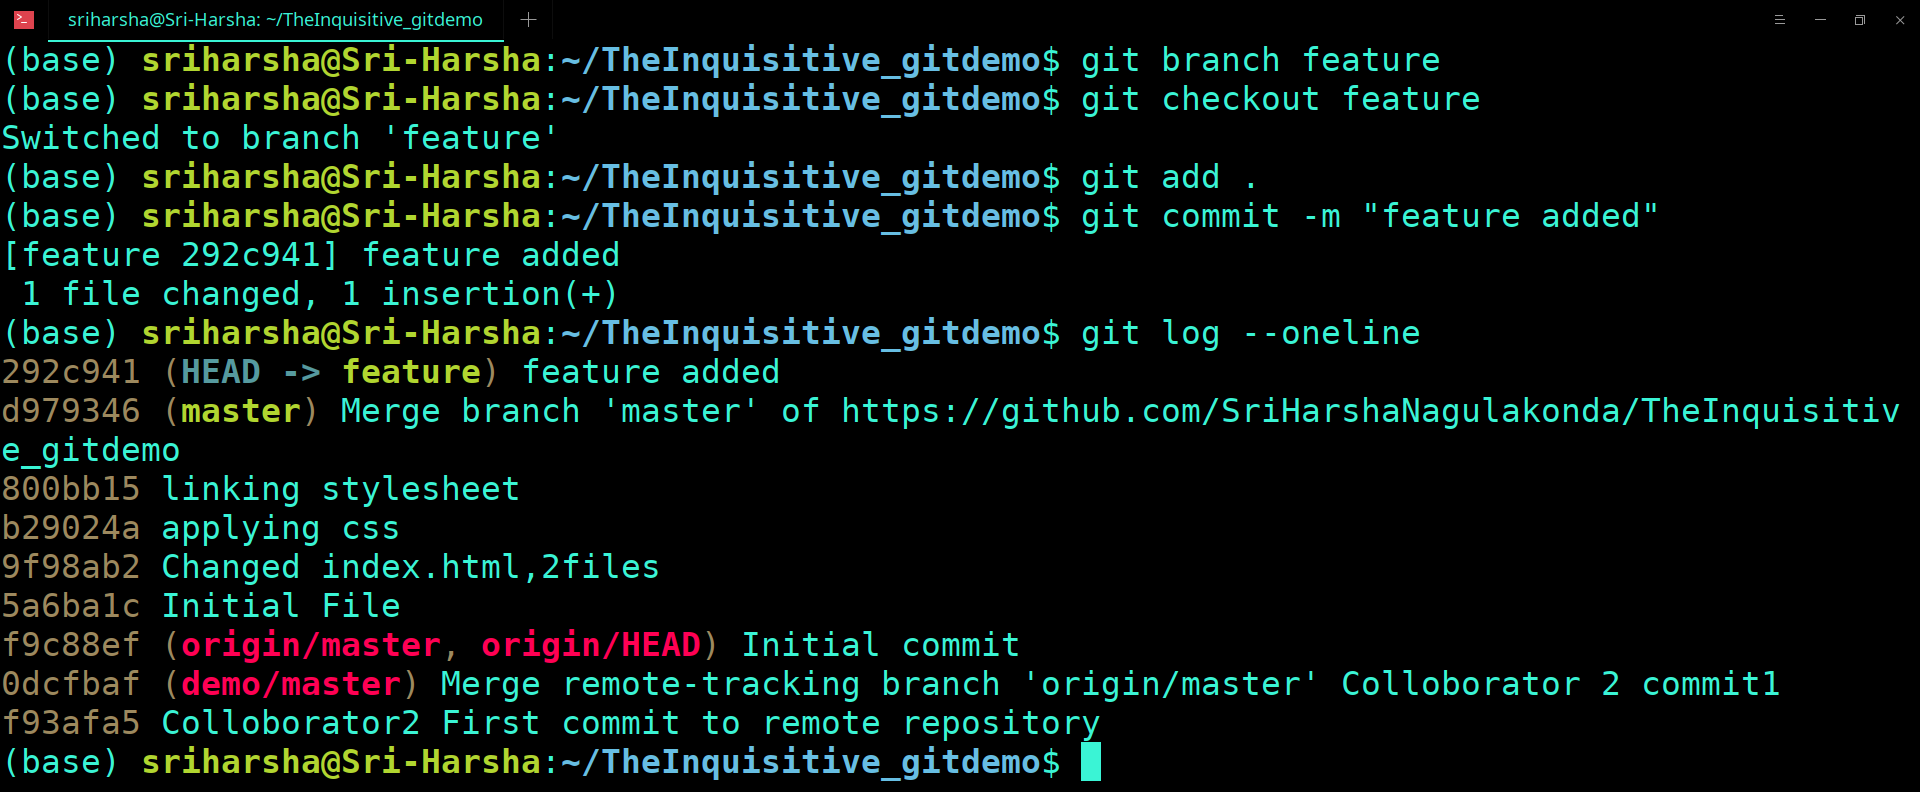
  10. Collaborator1(Harsha) wants to store his changes separately, then he will create the new branch using the command git branch
    Syntax : git branch <branch_name>
    GIT BRANCH
  11. Now new branch is created with the <branchname> specified in the command. To navigate to that branch, need to use the another command
    git checkout
    Note: Instead of above 2 steps (9, 10). We can use single command. Which will create the branch and navigate to the created branch in a single step git checkout -b
  12. Collaborator1(Harsha) made some changes and committed to the feature branch (newly created branch).
    GIT CHECKOUT
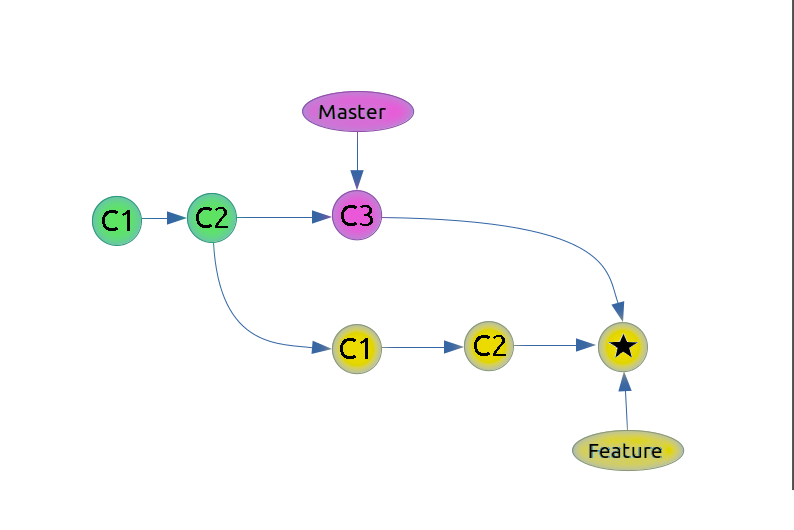
    Now, Collaborator1(Harsha) want to merge the changes (newly created branch) with master branch.
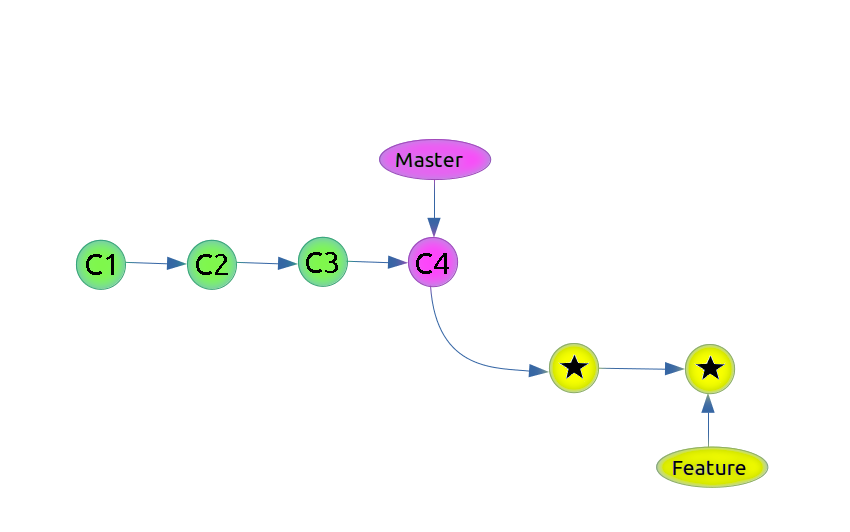
    To achieve this he can use either git merge or git rebase
    If he uses git merge then, A new “merge commit” in the feature branch is created that ties together the histories of both branches.
    Syntax : git merge <branch_name>
    GIT MERGE FEATURE
    GIT MERGE FEATURE
    If he uses git rebase then, instead of using a merge commit, rebasing re-writes the project history by creating brand new commits for each commit in the original branch
    Syntax : git rebase <branch_name>
    GIT REBASE
    GIT REBASE